
Marine A/C Installation 101
Selecting A System – Selecting a Marine Air Conditioner.
There are many considerations that should be taken into account when choosing the marine air conditioning unit that would be most appropriate for your vessel.
The items listed below do not include all things to consider, but certainly answer most for a marine air conditioning installation.
1) First and foremost is determining the size unit (BTU’s) needed to produce optimal heating and cooling for your vessel. For below deck areas the formula consists of taking the cubic dimensions (LxWxH) and multiplying this by 14. This calculation will provide you with the ballpark BTU’s needed.
2) Secondly, the unit location needs to be determined. The unit must
physically fit in the location desired. Ideally, the unit should be mounted
under a settee seat, a dinette seat, under a Vee berth, or in a hanging locker somewhere INSIDE the cabin of the vessel. THE UNIT AND CONTROL BOX SHOULD NEVER BE INSTALLED IN AN EXPLOSIVE ENVIRONMENT
(IE: ENGINE COMPARTMENT).
Here are some additional points to consider.
A) Can you attach ducting and/or splitters to the unit with the desired location?
B) Are the proposed supply vents located as high as possible in the cabin without creating any excessive bends?
(every 90 degree bend reduces efficiency by 14%)
C) Can a proper size return grill be cut in proximity to the evaporator of the marine air conditioner?
D) Can condensation water drain freely to the bilge or to a sump pump?
(If not we have the Mermaid Condensator – see accessories for details.)
3) Thirdly, in locating your water in and out areas, ensure that the pump and strainer will be located BELOW the water line and the overboard thru-hull discharge is not more than 6″ to 8″ above the water line.
Location ~
Self contained marine air conditioners Must be placed inside the air conditioned area of the vessel – NEVER let them suck bilge fumes or possibly the carbon monoxide laden air from an engine room. The units must also recirculate the air conditioned air of the boat, not hot/humid fresh air. Every pass of air over the evaporator will drop the temperature about 18-22°F- no unit can take in 95% humidity,95°F air and discharge it at a dry 55°F!
The most common installation mistake is to leave even a small opening such as a 1″ crack that is open to the liner of the boat – you will end up mixing for example 50% bilge air with the air conditioned air – the unit will never catch up and sweat profusely from the humidity – the compartment must be air tight from the bilge or liner.
Discharge air ducting ~
The discharge air will normally travel about 8-10′, So of course you will have to run a duct to the Vee berth for example if the unit is in the main salon and you want to cool the Vee berth.
Our units are designed to bring the air temperature down to about 70°F – if you try to attain a lower temperature you will develop a freeze up condition.
Return air ducting ~
There is no need for return air ducting – There is no need to have the evaporator up against the return air grill, in fact it’s better to have the opposite – make sure the evaporator has at least 3-4″ of space from a bulkhead.
Plumbing ~
Use Teflon tape on all threaded fittings.
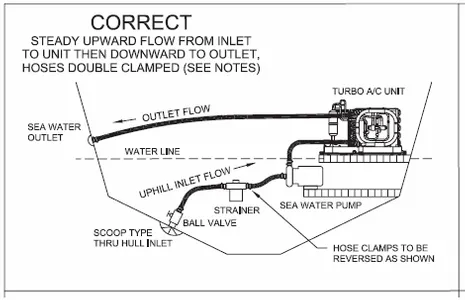
It is imperative that the seawater piping be routed continually uphill from the through-hull inlet to the strainer and to the pump (all below the water line). Then smoothly up to the unit/overboard discharge, without any loops, and with only one high point in the system. Whenever air gets into the system, which can happen in heavy seas or a sharp turn, it can become trapped in the pump. Because a centrifugal pump cannot pump air, flow through the system is lost. Plumbed as stated above, Air bubbles in the piping will rise naturally through the pump and then be expelled. It will also make winterizing the system much easier.The intake through hull (foot Scoop) should be as low as possible in the water in a location that is always underwater and not exposed to the backwash of the propellers whereby air bubbles could be ingested. Almost every marine air conditioning pump is a flooded volute pump and must be mounted below the waterline. For boats that are in dry storage, you may want to install a Mermaid Bleed Valve fitting at the discharge of the pump for releasing the back pressure to simplify priming.
Hints and Tips –
We do not recommend it, but you can “T” off of a head intake, however, an in-line check valve should be installed in the marine hose to the head.
The units’ discharge through hull fitting should be between 6″ and 8″ above the waterline – if below 4″ it would have to be treated as a “below the waterline” through hull and would be required to have a valve – above 8″ the noise of the running water may be bothersome.
The condensate drain line is a gravity line and the highest point of this line will determine the water level in the condensate pan. A common mistake is to have the condensate line run a couple of feet at the same level of the chassis – if there is any section even 1″ above the bottom of the chassis, you will have excessive water in the drain pan.
(Consider The Mermaid Condensator) Marine Air Conditioning Installation